您现在的位置是:网站首页> 编程资料编程资料
Ant Design 组件库之步骤条实现_React_
![]() 2023-05-24
555人已围观
2023-05-24
555人已围观
简介 Ant Design 组件库之步骤条实现_React_
引言
antd 组件库是基于 Ant Design 设计体系的 React UI 组件库,antd 为 Web 应用提供了丰富的基础 UI 组件,可以用于研发企业级中后台产品。这篇咱们介绍 antd 组件库之 步骤条。
1 antd 之 Steps API
步骤条 Steps 的用处是在 当任务复杂或者存在先后关系时,将其分解成一系列的步骤,从而达到简化任务的目的。其 DOM 节点为 :
... ... ...
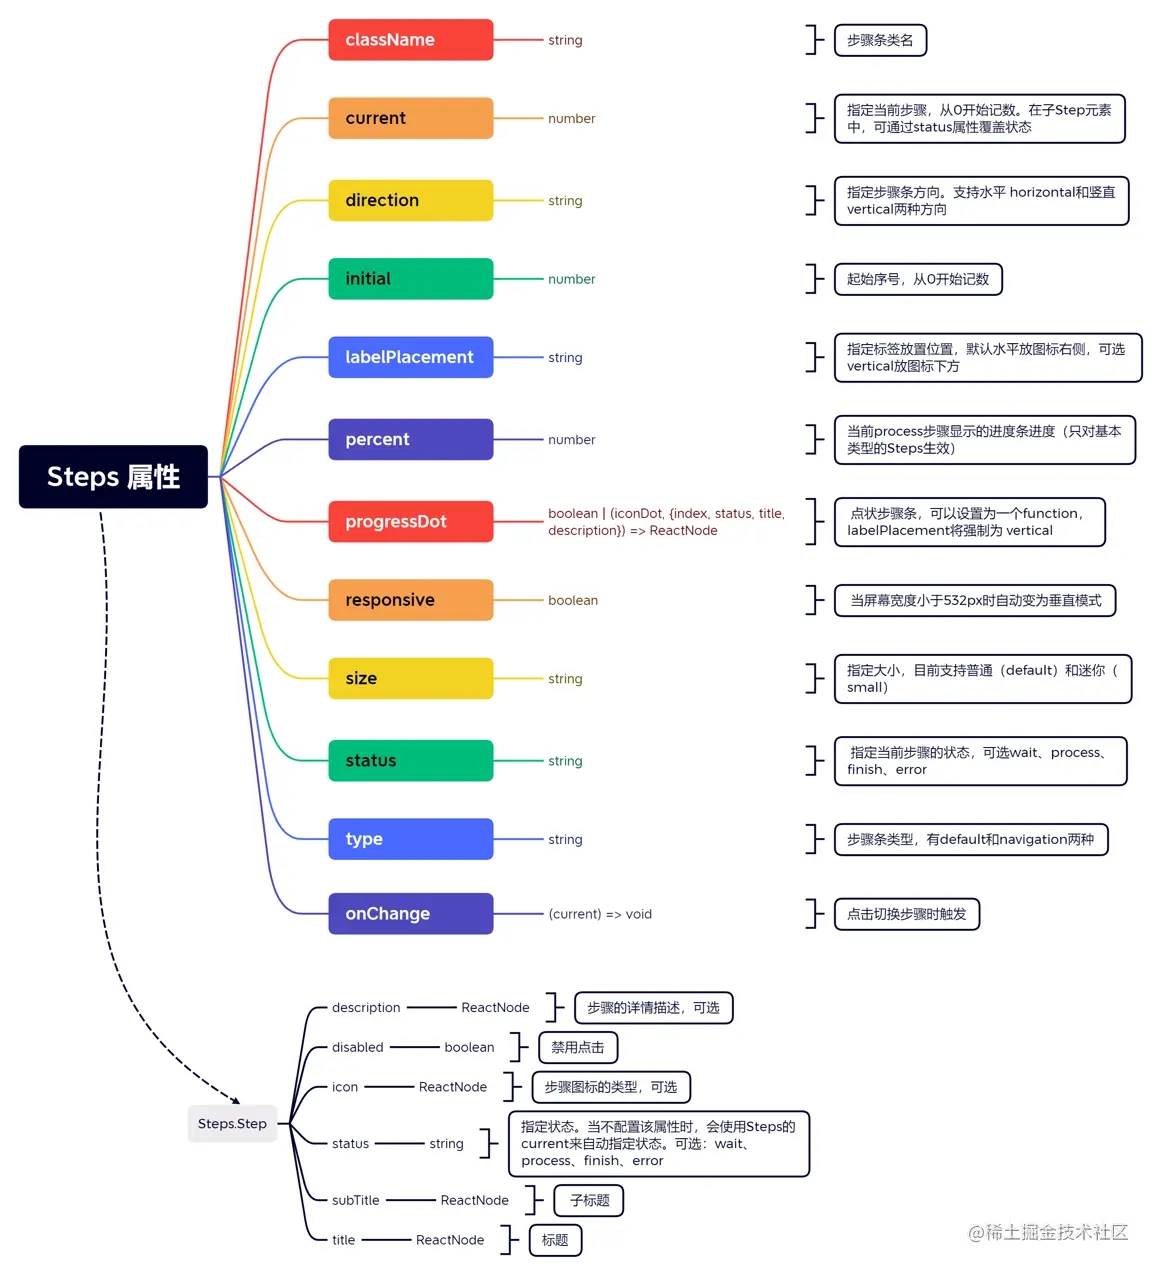
antd 中的步骤条样式丰富,可以通过设置 Steps 和 Step 的属性来产生不同的 步骤条 样式,详细的这里我进行一个整理:
下面做一些实践。
2 antd 之 Steps 示例
先来看最简单的静态的步骤条,看代码:
import { Steps } from 'antd'; import React from 'react'; const { Step } = Steps; const App = () => ( 可以看到现在 current 默认选择了 1,来看效果:

如果 current 我们选择了 2, 那会是什么样子的呢:

再来看一个 带图标的步骤条,这里用了 antd 的 icon,上代码:
import { LoadingOutlined, SmileOutlined, SolutionOutlined, UserOutlined } from '@ant-design/icons'; import { Steps } from 'antd'; import React from 'react'; const { Step } = Steps; const App = () => ( 来看效果:

来有意思一些的,看看动态的吧:配合按钮进行步进或后退,来表示一个流程的处理进度,上代码:
import { Button, message, Steps } from 'antd'; import React, { useState } from 'react'; const { Step } = Steps; const steps = [ { title: 'First', content: 'First-content', }, { title: 'Second', content: 'Second-content', }, { title: 'Last', content: 'Last-content', }, ]; const App = () => { const [current, setCurrent] = useState(0); const next = () => { setCurrent(current + 1); }; const prev = () => { setCurrent(current - 1); }; return ( <> {steps.map((item) => ( {steps[current].content} {current < steps.length - 1 && ( )} {current === steps.length - 1 && ( )} {current > 0 && ( )} ); }; export default App; 还有 CSS 代码,同级目录下写个 index.less:
.steps-content { min-height: 200px; margin-top: 16px; padding-top: 80px; text-align: center; background-color: #fafafa; border: 1px dashed #e9e9e9; border-radius: 2px; } .steps-action { margin-top: 24px; } 来看效果:

步骤条还可以通过 Steps 的 status 属性来指定当前步骤的状态,来看示例:
import { Steps } from 'antd'; import React from 'react'; const { Step } = Steps; const App = () => ( 来看效果,这里是第 1 步出现 err 了:

咱们也可以给步骤条的每个步骤添加自定义的展示,上代码:
import { Popover, Steps } from 'antd'; import React from 'react'; const { Step } = Steps; const customDot = (dot, { status, index }) => ( step {index} status: {status} } > {dot} ); const App = () => ( 来看效果:

最后来看一个 Steps 中的 Step 可点击的步骤条,上代码:
import { Divider, Steps } from 'antd'; import React, { useState } from 'react'; const { Step } = Steps; const App = () => { const [current, setCurrent] = useState(0); const onChange = (value) => { console.log('onChange:', current); setCurrent(value); }; return ( <>从上面的代码可以看到,当你点击 change Steps 的时候,会触发 onChange 回调函数,咱们这里的 onChange 只做了两件事情:
(1) 控制台打印 current,current 大家应该熟悉,就是第几个 Step;
(2) 设置 setCurrent。这个地方不限于此,尽可以发挥想象。
来看效果:

好了,以上分享了 Ant Design 组件库之步骤条。
更多关于Ant Design 组件库步骤条的资料请关注其它相关文章!
相关内容
- Vue3 源码解读静态提升详解_vue.js_
- 业务层hooks封装useSessionStorage实例详解_JavaScript_
- 微信小程序长按识别二维码的几种情况分析_javascript技巧_
- 三分钟带你快速学会微信小程序的条件渲染_javascript技巧_
- vue和react中关于插槽详解_vue.js_
- 解决uni-app微信小程序input输入框在底部时,键盘弹起页面整体上移问题_javascript技巧_
- Vue3 源码解读之 Teleport 组件使用示例_vue.js_
- 微信小程序生命周期和WXS使用实例详解_javascript技巧_
- vue新玩法VueUse工具库具体用法@vueuse/core详解_vue.js_
- Vue项目获取url中的参数(亲测可用)_vue.js_